Prerequisites
Platform
Currently the Green Tea engine can be run only on Windows Platforms (and it has been tested only Windows 10). Additionally games that made with this is Engine also target Windows as their Platform.
Premake5
Green Tea and it's projects are using premake5 in order to generate the necessary project files. Thus you will need to have downloaded and be able to run premake5 from the command line before you start building and using the Engine. You can download a prebuild binary either from their webpage or the github page.
After you have downloaded the latest prebuild binary you need to setup the appropriate enviroment in order to able to run the premake from the command line:
- Open File Explorer
- Right Click: This PC and Select: Properties
- Click: Advanced system settings
- Click: on the button Enviroment Variables
- Add to variable: Path the path to your local copy of premake5.exe .
If you need more information about how to use premake I will suggest you looking at their documentation
C++17 Compiler
You will neeed a modern C++ compiler with support for C++17 as well as Windowns API calls. The recomended version of Visual Studio (see bellow) should be covering you.
git (reccomend - optional)
In order be able to run the Engine you must first download and build the source code yourself. Because of this it's recommended to install git. Since it will make the procces of dowloading the current as well as the future versions much easier. You can dowload the installer from their webpage.
If you want to learn more about how git works they are a lot of great resources online, as well a very in depth documentation on their website that contains:
Visual Studio 2019 (reccomend - optional)
I reccomend to use Visual Studio 2019 or later, but any version that supports C++17 will be capable of building the Engine as well used for coding your own Scripts*. You can download the latest version of Visual Studio from their website.
* Although any version of Visual Studio that supports C++17 will be capable of writing your scripts. The engine assumes you are running Visual Studio 2019 or later and builds the project files accordingly. If you are using an earlier version and you are running into problems when trying to open the scripts solution, jump into the command line navigate to the directory that contains your folder and enter premake5 vs20**.
Other editors
If you don't want to use Visual Studio as your IDE then you have to be able to run msbuild from the command line. In order to build the Engine and your scripts manually.
Installing the Engine
Clonning repository
The first thing you need in order to install the Engine is to get your hands on source code.
- In case you are using
git:git clone --recursive https://github.com/VMormoris/GreenTea - If you are not using
git, then after downloading the Engine's source code make sure you have all it's dependecies that can be found on the3rdPartyfolder.
Building the Engine
In order to build the Engine you need to run premake5 from the folder where you saved the Engine during the Clonning step:
- Open the command line and navigate to the appropriate directory.
- Run:
premake5.exe vs20**(Change the "**" to the version of Visual Studio you are running more info)
GreenTea.sln file has been produced. You can double click on it to build and try out the Engine. It is important to keep in mind that logic for your games is being loaded at runtime. Because of this if you want write Scripts you need to Run the Engine as a stand alone application (NOT through Visual Studio) and in Release mode.
Create shortcut (optional)
At this stage an executable name CupOfTea.exe should have produce bin/Release-windows/CupOfTea folder. I recommend you to create a shortcut on Desktop so you don't need to navigate every time you want to open The Engine on this directory.
Managing Projects
Project description
A Green Tea Project is basically a folder where the Engine stores all the files that are needed to remember what were you working on. The Engine stores a lot of files in order achieve a better user experience when you close and reopen it at a later time.
Project Manager
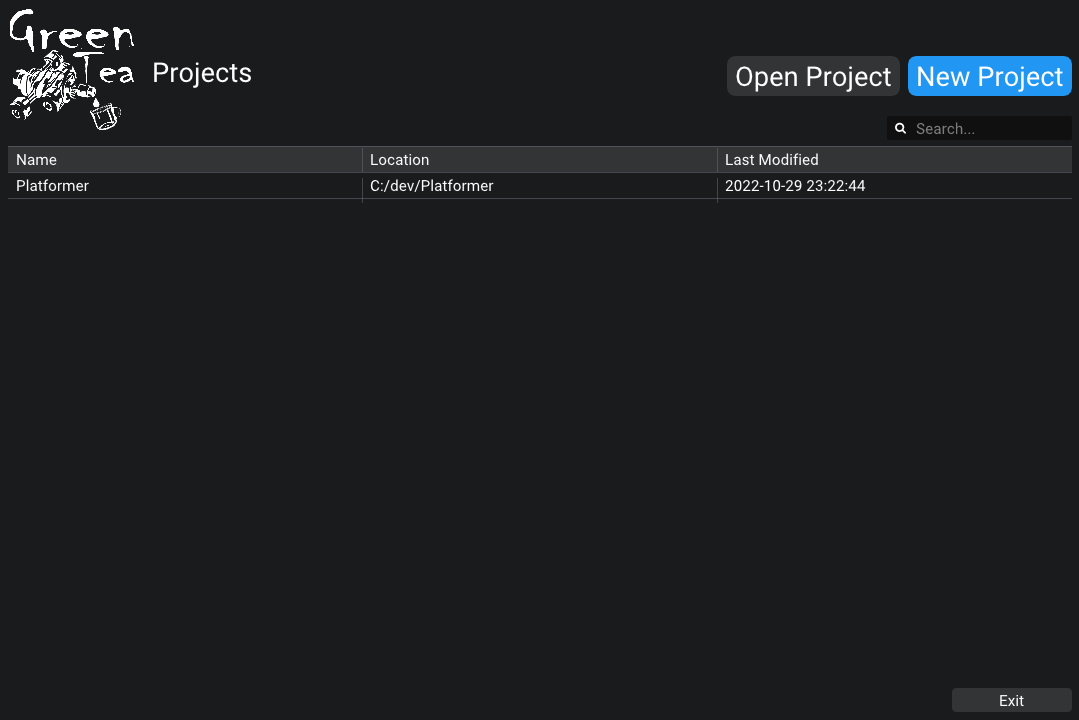
The engine comes with a build in Project Manager as you can see the Picture bellow. Currently it's capabilities are limited but it has the most essential tools like creating new project, opening existing projects from disk (discovering), searching for project on the list and starting projects with the editor.
Creating a new Project
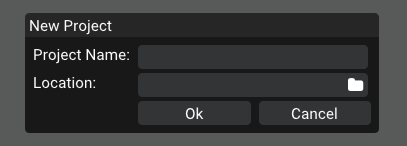
To create a new project start by opening the Engine, and press the big blue button on the top right corner of the screen New Project. A popup should appear that you can use to specify the Name for your Project as well as the location where the Project folder that we discuss earlier will be saved. By clicking to the folder Icon you can select the location using the default Navigation system of your operating system.
Once you have fill the both fields with the desired values press Ok to Create your Project (The project will be atomatically opened by the Editor).
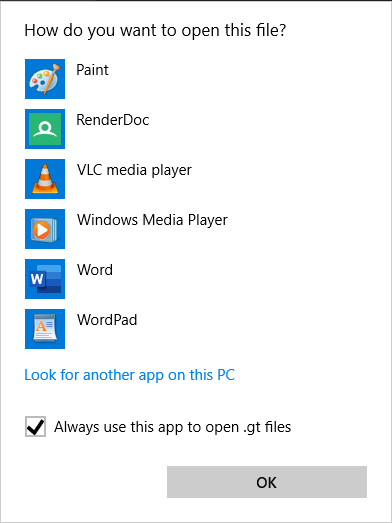
NOTE: If this is you first time starting a project using the Engine the Open With functionality will be triggered because your operating system doesn't know which program to use for open *.gt files. In this case make sure you tick the option Always use this app to open .gt files and navigate to the directory where CupOfTea.exe is located to choose it.
Opening a Project
To open a project that you have locally on disk, but doesn't appear into the list of project just press the Open Project button on the top right and select Project folders.
Starting your Project
The easiest way to start a project is to double click it on the list of Project Manager. This will automatically open the project using the editor as well as open the Visual Studio solution that will be used for building your scripts.
If you want to mannually start the project then navigate to the project's folder and double click on the .gt file.
Editor
Green Tea engine comes with a level Editor named CupOfTea that you can use to build your scenes using a UI. The Editor has many panels most of which you can toogle on and off using the View menu on the top left corner.
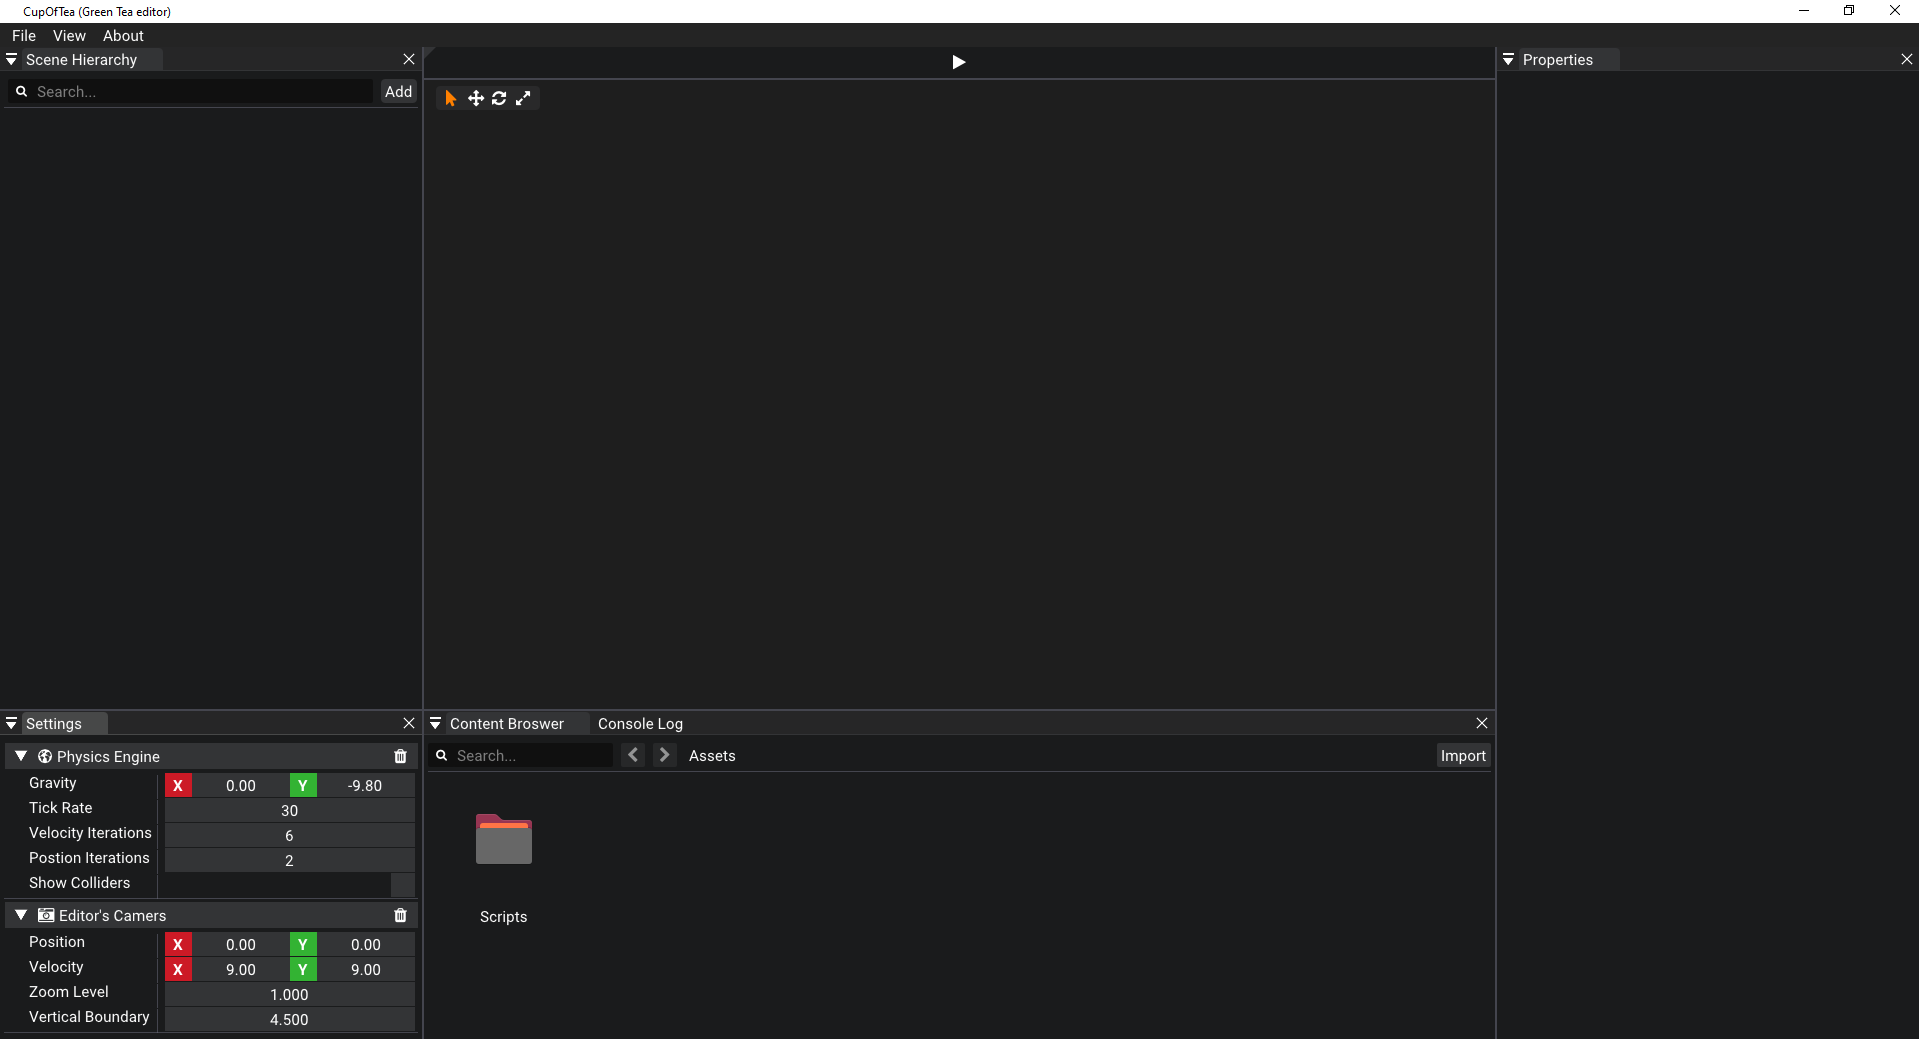
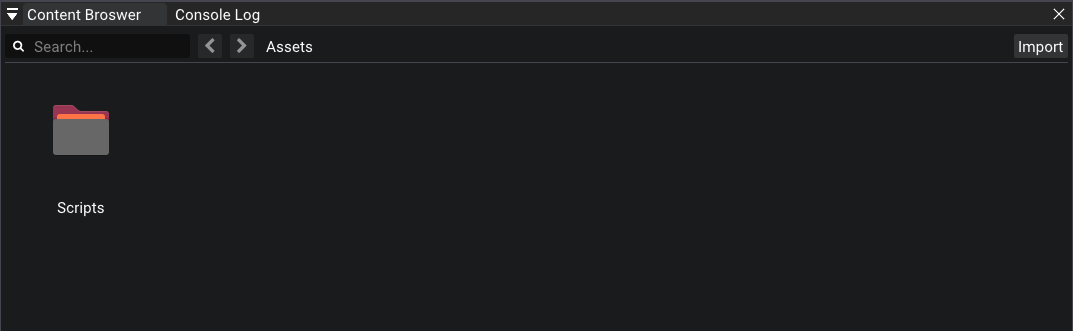
Content Browser
The Content Browser panel can be used to manage your assets. The first time you open your Project it will only contain an Empty Folder called Scripts.
- You can
createa New Folder, Script or Animation Asset by Right Clicking on the empty space on the Panel. - You can
importassets like Textures, Sounds and Fonts by clicking the Import button on the top right corner. - The
searchbarcan be used to filter assets or folders on the current directory.
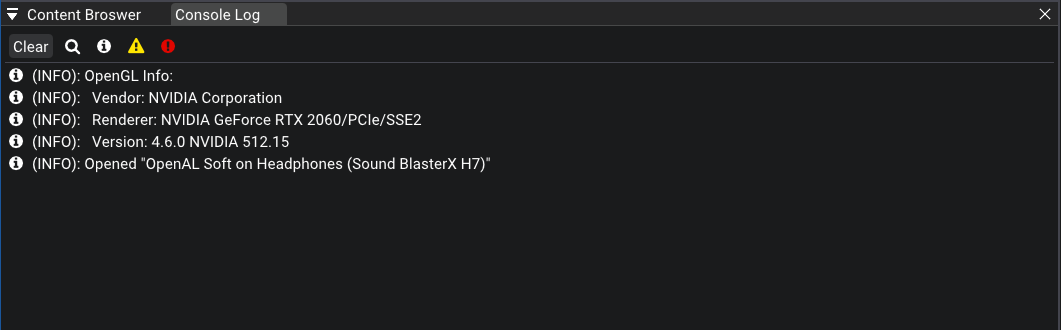
Console Log
In the Console Log panel you can see messages produce by the Engine as well as your own Scripts.
- Press the
Clearbutton to empty the list of messages. - Use the other buttons to filter the messages by type.
You can choose between one or more types by simply activating one or more buttons. If none of the buttons are active then all types of messages will be shown on your screen.
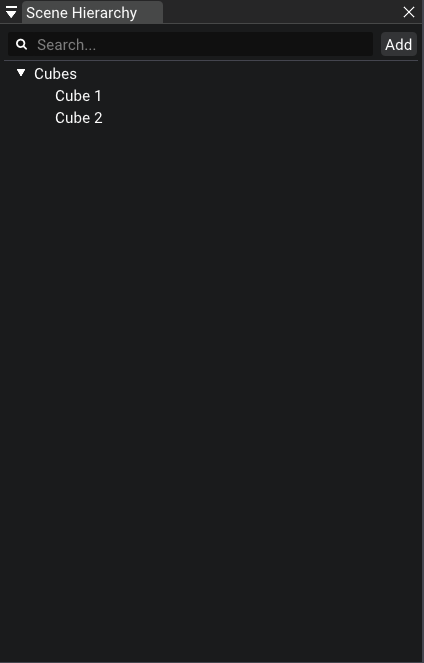
Scene Hierarchy
Using the Scene Hierarchy panel you can organized your Entities as well as select an Entity. When entity is selected an orange overlay will appear over it on the Viewport panel and you can tweak it's components on the Properties Panel.
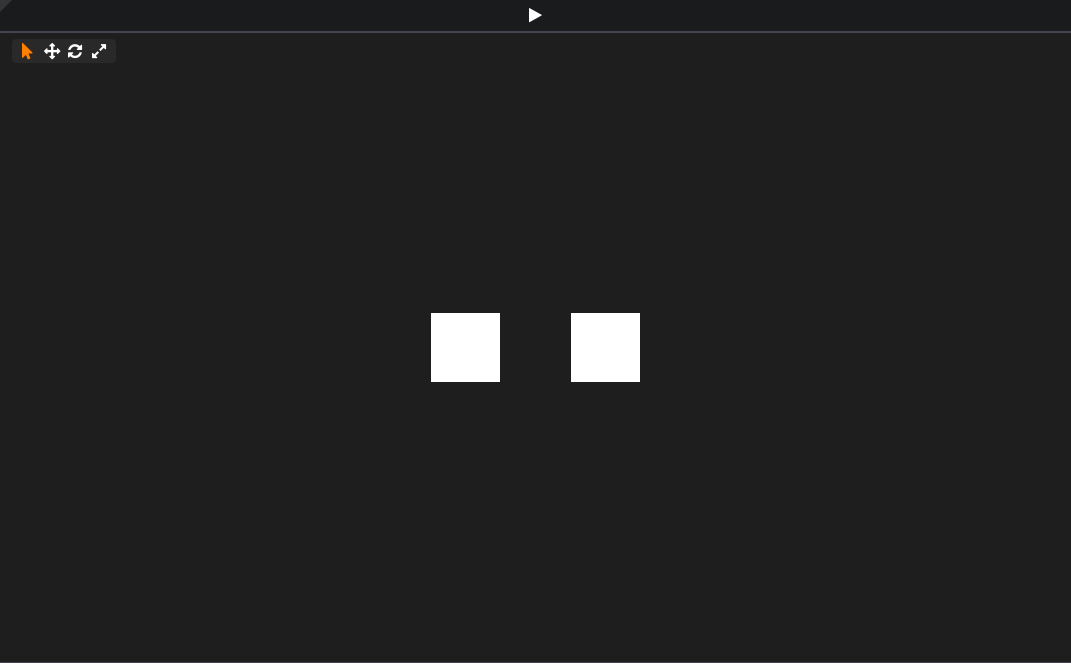
Viewport
In the Viewport panel you can see how the entities are layed out on your scene from the perspective of your Editor's camera. When the Viewport is focus you can press Q, W, E, R keys to switch between Guizmo modes. This will help you to select, move, scale or rotate Entities on the fly. You can press the play button at the top to test your game (if you don't have a Primary Camera on your scene nothing will appear).
Note: In order for an Entity to appear on the Viewport and be able to select it. It must have both Transformation Component as well as one of the Renderable components.
Properties
In the Properties panel you can tweak the Components of the currently Selected Entity.
- Double click on the name at the top to change it's name. Press enter to save your changed name. (Entities' names also might also be refered as
Tag) - Press the
Addbutton to select a Component that will be added to an Entity. - You can
deletea Component at any time by pressing the `Trash` button. - Hover over the names of the components to get some feedback on what the actually do.

Physics
Green Tea has only 3 types of components (currently) to make entities obey Newton's laws: Rigidbody2D, BoxCollider, CirlceCollider. To make all this happen the Engine uses a library name: box2d. Reading the documentation of the library might prove helpfull to you if you want to have a full understanding of how things work.
It is important to note here that not all entities are handled by box2d. In order for an entity to handled by box2d it must have both a Rigidbody and one of the previously mention colliders. It's also very important to understand that entities that are handled by box2d should only be update the Transformations and Velocities during the FixedUpdate method.
Rigidbodies
According to box2d a rigidbody is: "A chunk of matter that is so strong that the distance between any two bits of matter on the chunk is constant. They are hard like a diamond." They are three types of Rigidbodies:
Staticbodies are not affected by gravity forces and wouldn't move by changing their Velocity.Staticbodies also don't collide with other type rigidbodies expect the dynamics ones.Kinematicbodies are moved by their Velocity but not are affected by the gravity forces.Kinematicbodies also don't collide with other types rigidbodies expect the dynamics ones.Dynamicbodies are movable objects that are affected by the gravity forces.Dynamicbodies collide with all other types rigidbodies, as well as between them.
Colliders
BoxCollidergives a box like shape to the entity that is attached to. It enables the entity to collide with others.CircleCollidergive a circle shape to the entity that is attached to. It enables the entity to collide with others.
Writing Sripts
Scripts are basically the Game Logic of your game. Scripts can be attached to entities and modified using the Editor. They are made using C++ code that is executed during the "play" state.
Reflection
Green Tea comes with it's on reflection system name gtreflect. It use llvm/libclang to parse your header files inside the src directory into two steps (prebuild and postbuild) and generate all the necessary files that the Engine needs for it's reflection.
Note: Because llvm is over 30GiB and takes a lot of time to build, I decided to not ship the code together with the Engine and force users to go through the pain of building it. Besides that the source code for gtreflect is available on github in other repository if you want to check it out or build it yourself.
Creating Scripts
You can create Scripts for your game logic using one of the two following alternatives:
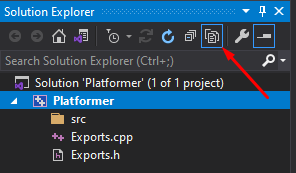
- Using the editor: By right clicking on the
Content Browserand selecting Native Script -> Scriptable Entity. - You can also use Visual Studio to create your
Scriptsjust make sure you are creating under thesrcfolder as mention above.
In order to make sure you see the src directory make sure you have selected Show All Files on your solution as shown in the picture bellow:
Script Definition
Unlike normal C++ classes, GreenTea Scripts have it's own signature that helps with reflection and they must inherit from ScriptableEntity:
using namespace gte;

CLASS()
Player : public ScriptableEntity {
//Your method(s) & field(s) definition goes here.
};
The CLASS() macro can optionally accept a name parameter, that will define the name that will be shown on the Editor. If this parameter is not defined the class' name will be used instead.
ScriptableEntity comes with a collection of virtual functions that can be overriden by your Scripts:
class ScriptableEntity{
public:
    //Called when the entity is spawned
    virtual void Start(void) {}
    //Called right before the entity is destroyed
    virtual void Destroy(void) {}
    //Called right after a Physics tick
    virtual void FixedUpdate(void) {}
    //Called every frame
    virtual void Update(float dt) {}
    //Called when the Entity starts a collision with an other rigidbody
    virtual void onCollisionStart(Entity other) {}
    //Called when the Entity stops colliding with an other rigidbody
    virtual void onCollisionStop(Entity other) {}
};
Events
At some point on your journey on making a game you will need to interact on Events such as a key on the keyboard was pressed, the a mouse button was pressed etc. The engine has two ways to interact with such events:
- Calling the
REGISTER()function to inform the Engine which method of an object should be called when an event like that occuries. For example:
REGISTER(EventType::KeyPressed, this, &Player::myMethod);
//where myMethod a user define function with the correct signature:
bool Player::myMethod(KeyCode keycode)
{
    //Your logic here
    return true;//Returning true means the Events is handled and thus will not be propagated any further.
}Input class for different types of events. For example:void Player::Update(float dt)
{
if(Input::IsKeyPressed(KeyCode::W))
{
//Your logic here
}
}
NOTE: When you call REGISTER() it is very important to also call UNREGISTER before the object is destroyed. Forgeting to do that may cause the engine to crash.
Exporting Fields
Another critical feature that Scripts provides you, is the ability to export fields and editing them using the Editor. This can be done using the PROPERTY() macro. Right now the Engine and it's reflection system only supports exporting primitive types as well as some building types. Bellow you can find the full list of types:
boolchar,byte(akaunsigned char)- Integers:
int16,int32,int64,uint16,uint32,uint64 - Floats:
float32,float64 - String:
std::string - User defined enumarations that have been defined using the
ENUM()macro - Asset:
Ref<Asset> - Entities:
Entity
The PROPERTY() macro just like the CLASS() and ENUM() macro also accepts a name as parameter. But it can also accepts some extra parameters depending on the type. An example for each type bellow:
ENUM()
PlayerState : public byte{
    Idle = 0,
    Running,
    Jumping
};

CLASS()
Player : public ScriptableEntity{
public:
    //Define your methods
private:
    PROPERTY(name = "Active")
    bool mActive = false;
    PROPERTY(name = "Character", min = 1, max = 156)
    byte mAge = 26;
    PROPERTY(name = "Number", min = 0, max = 1024)
    uint64 mNumber = 256;
    PROPERTY(name = "Speed", min = -1000.0f, max = 1000.0f)
    float32 mSpeed = 0.0f;
    PROPERTY(name = "Name", length = 64)
    std::string mName = "Vasilis";
    PROPERTY(name = "State")
    PlayerState mState = PlayerState::Idle;
    PROPERTY(name = "Sound Clip")
    Ref mSoundClip;
    PROPERTY(name = "Other Entity")
    Entity mEntity;
};
Execution Loop
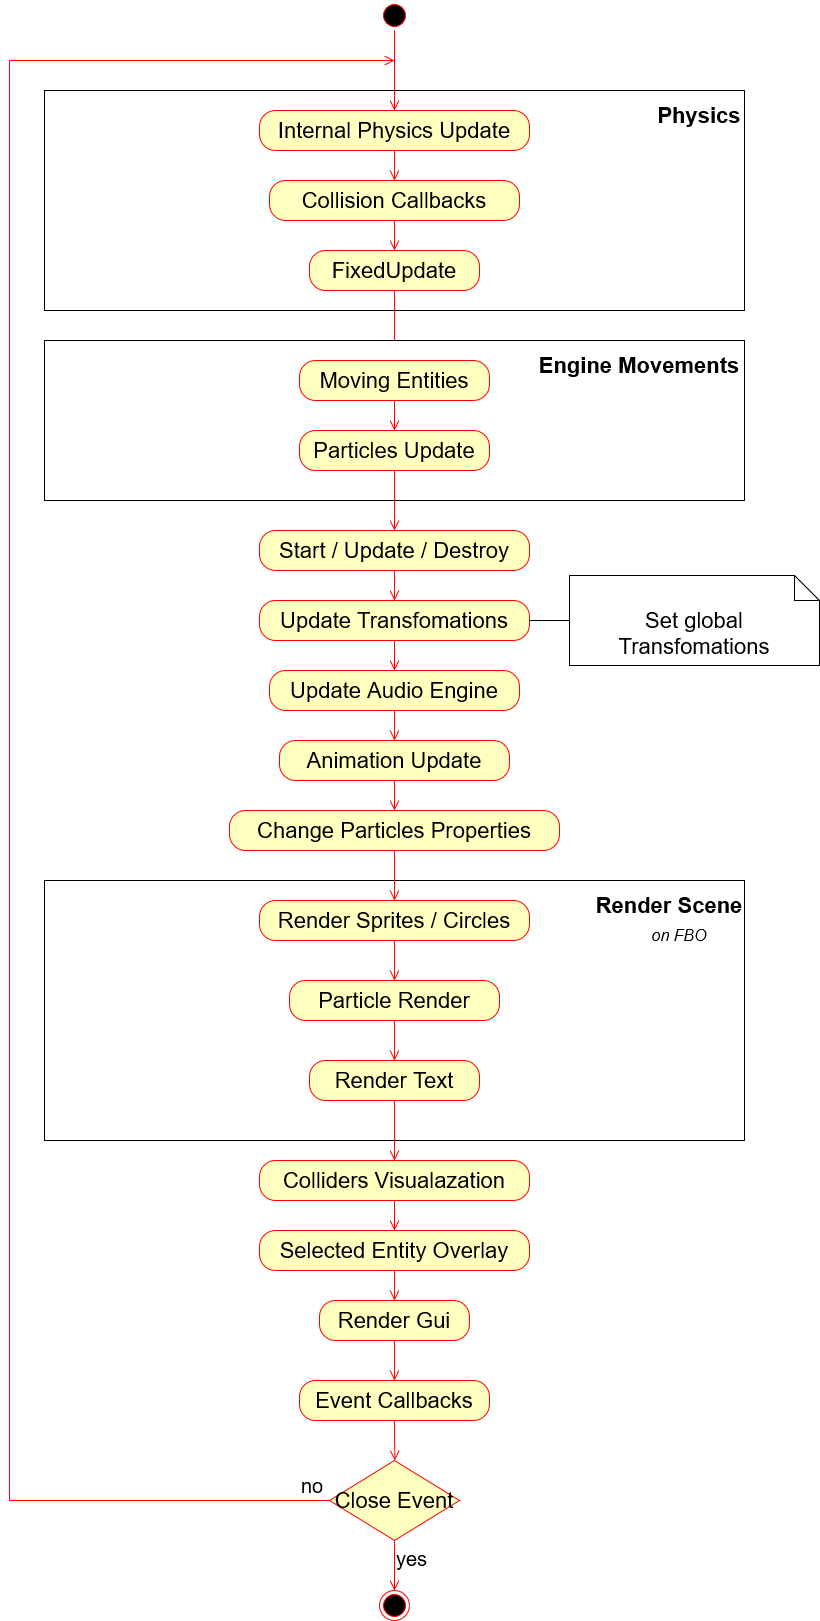
Bellow you can find a UML diagram that describes the execution loop of Engine: